本文将指导您如何以编程方式在Magento 2中添加customer属性。请按照我们之前的文章创建一个简单的模块,我们将使用它来演示本课程的编码以及如何创建安装脚本类。在本文中,我们将使用示例模块Mageplaza_HelloWorld和InstallDataclass。
推荐:
使用Magento 2客户属性添加额外的属性字段,以收集有关注册或帐户页面的重要客户信息。
以编程方式添加客户属性的概述
- 第1步:创建安装文件InstallData.php
- 第2步:定义install()方法
- 第3步:创建自定义属性
第1步:创建安装文件InstallData.php
首先,我们将创建InstallData.php文件:
文件: app/code/Mageplaza/HelloWorld/Setup/InstallData.php
<?php
namespace Mageplaza\HelloWorld\Setup;

use Magento\Eav\Setup\EavSetup;
use Magento\Eav\Setup\EavSetupFactory;
use Magento\Framework\Setup\InstallDataInterface;
use Magento\Framework\Setup\ModuleContextInterface;
use Magento\Framework\Setup\ModuleDataSetupInterface;

class InstallData implements InstallDataInterface
{
	private $eavSetupFactory;

	public function __construct(EavSetupFactory $eavSetupFactory)
	{
		$this->eavSetupFactory = $eavSetupFactory;
	}

}
在本课程中,我们定义了EAV设置模型,该模型将用于与Magento 2属性进行交互。
第2步:定义install()方法
之后,我们必须定义install()方法并创建eav设置模型:
public function install(ModuleDataSetupInterface $setup, ModuleContextInterface $context)
	{
		$eavSetup = $this->eavSetupFactory->create(['setup' => $setup]);
	}
	Next, we will use eavSetup object to add attribute:
public function install(ModuleDataSetupInterface $setup, ModuleContextInterface $context)
	{
		$eavSetup = $this->eavSetupFactory->create(['setup' => $setup]);
		$eavSetup->addAttribute(
			\Magento\Customer\Model\Customer::ENTITY,
			'sample_attribute',
			[
				'type'         => 'varchar',
				'label'        => 'Sample Attribute',
				'input'        => 'text',
				'required'     => false,
				'visible'      => true,
				'user_defined' => true,
				'position'     => 999,
				'system'       => 0,
			]
		);
}
第3步:创建自定义属性
最后,我们需要设置将使用属性的表单。在这一步中,我们需要定义eavConfig对象,它允许我们回调用该属性并为其设置数据。并且创建客户属性的完整代码是:
文件: app/code/Mageplaza/HelloWorld/Setup/InstallData.php
<?php

namespace Mageplaza\HelloWorld\Setup;

use Magento\Eav\Setup\EavSetup;
use Magento\Eav\Setup\EavSetupFactory;
use Magento\Framework\Setup\InstallDataInterface;
use Magento\Framework\Setup\ModuleContextInterface;
use Magento\Framework\Setup\ModuleDataSetupInterface;
use Magento\Eav\Model\Config;
use Magento\Customer\Model\Customer;

class InstallData implements InstallDataInterface
{
	private $eavSetupFactory;

	public function __construct(EavSetupFactory $eavSetupFactory, Config $eavConfig)
	{
		$this->eavSetupFactory = $eavSetupFactory;
		$this->eavConfig       = $eavConfig;
	}

	public function install(ModuleDataSetupInterface $setup, ModuleContextInterface $context)
	{
		$eavSetup = $this->eavSetupFactory->create(['setup' => $setup]);
		$eavSetup->addAttribute(
			\Magento\Customer\Model\Customer::ENTITY,
			'sample_attribute',
			[
				'type'         => 'varchar',
				'label'        => 'Sample Attribute',
				'input'        => 'text',
				'required'     => false,
				'visible'      => true,
				'user_defined' => true,
				'position'     => 999,
				'system'       => 0,
			]
		);
		$sampleAttribute = $this->eavConfig->getAttribute(Customer::ENTITY, 'sample_attribute');

		// more used_in_forms ['adminhtml_checkout','adminhtml_customer','adminhtml_customer_address','customer_account_edit','customer_address_edit','customer_register_address']
		$sampleAttribute->setData(
			'used_in_forms',
			['adminhtml_customer']

		);
		$sampleAttribute->save();
	}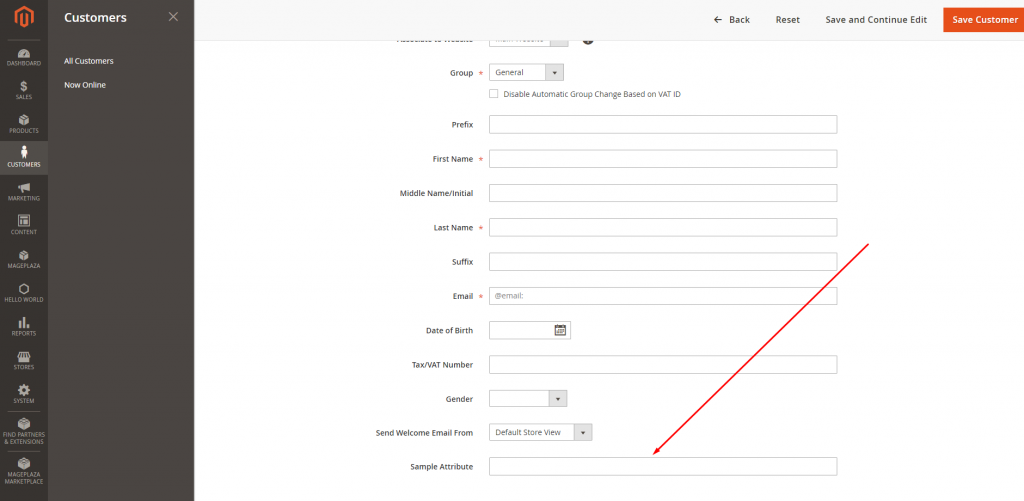
} 现在,让我们跑comman行安装模块:php magento setup:upgrade和php bin/magento setup:static-content:deploy然后检查结果。它将显示如下: