我们都知道Magento 2结帐流程包含2个步骤。运输以及付款和审查步骤。对于个人用途,您可能需要添加一些其他逻辑,例如将付款和查看分开到单个步骤,或者为您自己的自定义创建一个全新的步骤。
本主题将指导您在Magento 2中创建新的步骤结帐。该步骤特别做一件事,让用户知道他们是否已登录。实际情况不多,但是稍后我们将讨论高级主题。了解更多:通过一步式结帐简化结帐流程
相关文章
- Magento 2自定义结帐主题
- 在Magento 2中添加自定义结帐字段
- Magento 2优化结帐页面
- 如何向结帐中添加新的输入表单
- 自定义结帐页面
- 检出页2列
- 如何向结帐中添加新的输入表单
向结帐页面添加新步骤。
- 步骤1:创建实现视图模型的.js文件
- 步骤2:为组件创建.html模板
- 步骤3:将新步骤添加到Checkout页面布局
您应该知道如何创建基本的Magento 2模块。所有自定义文件都将在此模块内。
让我们开始。
步骤1:创建实现视图模型的.js文件。
checkout-login-step.js在Mageplaza/HelloWorld/view/frontend/web/js/view目录下创建文件。
基本上,我们需要step_code,step_title,order以及condition允许以显示此步骤。
这是代码(阅读代码注释以获取更多信息)
define(
[
'ko',
'uiComponent',
'underscore',
'Magento_Checkout/js/model/step-navigator',
'Magento_Customer/js/model/customer'
],
function (
ko,
Component,
_,
stepNavigator,
customer
) {
'use strict';
/**
* check-login - is the name of the component's .html template
*/
return Component.extend({
defaults: {
template: 'Mageplaza_HelloWorld/check-login'
},
//add here your logic to display step,
isVisible: ko.observable(true),
isLogedIn: customer.isLoggedIn(),
//step code will be used as step content id in the component template
stepCode: 'isLogedCheck',
//step title value
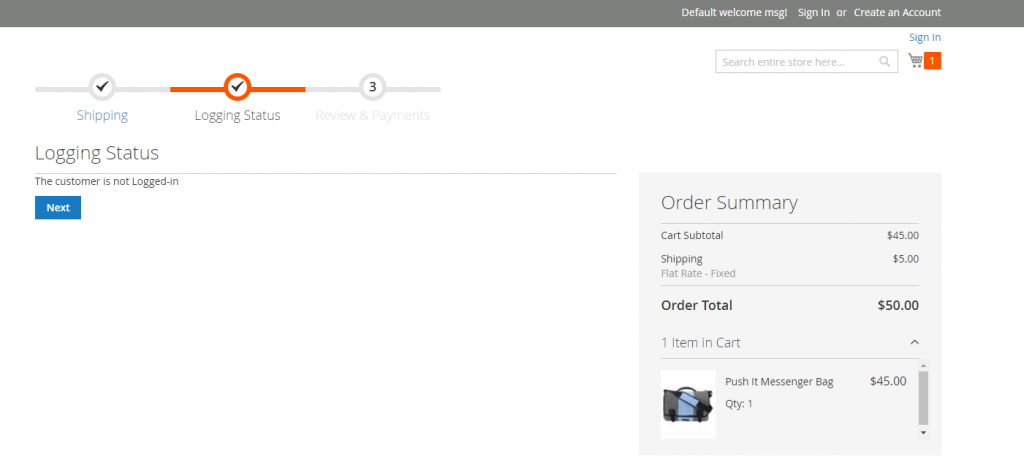
stepTitle: 'Logging Status',
/**
*
* @returns {*}
*/
initialize: function () {
this._super();
// register your step
stepNavigator.registerStep(
this.stepCode,
//step alias
null,
this.stepTitle,
//observable property with logic when display step or hide step
this.isVisible,
_.bind(this.navigate, this),
/**
* sort order value
* 'sort order value' < 10: step displays before shipping step;
* 10 < 'sort order value' < 20 : step displays between shipping and payment step
* 'sort order value' > 20 : step displays after payment step
*/
15
);
return this;
},
/**
* The navigate() method is responsible for navigation between checkout step
* during checkout. You can add custom logic, for example some conditions
* for switching to your custom step
*/
navigate: function () {
},
/**
* @returns void
*/
navigateToNextStep: function () {
stepNavigator.next();
}
});
}
);
步骤2:为组件创建一个.html模板。
在上面的步骤中,我们使用它Mageplaza_HelloWorld/check-login作为模板,来创建它。在目录下
创建一个新的html文件。check-login.htmlMageplaza/HelloWorld/view/frontend/web/template
这是代码
<!--Use 'stepCode' as id attribute-->
<li data-bind="fadeVisible: isVisible, attr: { id: stepCode }">
<div class="step-title" data-bind="i18n: stepTitle" data-role="title"></div>
    <div id="checkout-step-title"
         class="step-content"
         data-role="content">
         <p>The customer is <span data-bind="if: !isLogedIn">not</span> Logged-in</p>
        <form data-bind="submit: navigateToNextStep" novalidate="novalidate">
            <div class="actions-toolbar">
                <div class="primary">
                    <button data-role="opc-continue" type="submit" class="button action continue primary">
                        <span><!-- ko i18n: 'Next'--><!-- /ko --></span>
                    </button>
                </div>
            </div>
        </form>
    </div>
</li>
步骤3:将新步骤添加到Checkout页面布局。
我们需要扩展检出页面的布局,以便显示新的步骤
在模块中添加此文件:Mageplaza/HelloWorld/view/frontend/layout/checkout_index_index.xml
内容如下:
<page xmlns:xsi="http://www.w3.org/2001/XMLSchema-instance" layout="1column" xsi:noNamespaceSchemaLocation="urn:magento:framework:View/Layout/etc/page_configuration.xsd">
    <body>
        <referenceBlock name="checkout.root">
                <arguments>
                    <argument name="jsLayout" xsi:type="array">
                        <item name="components" xsi:type="array">
                            <item name="checkout" xsi:type="array">
                                <item name="children" xsi:type="array">
                                    <item name="steps" xsi:type="array">
                                        <item name="children" xsi:type="array">
                                            <!-- The new step you add -->
                                            <item name="check-login-step" xsi:type="array">
                                                <item name="component" xsi:type="string">Mageplaza_HelloWorld/js/view/checkout-login-step</item>
                                                    <!--To display step content before shipping step "sortOrder" value should be < 1-->
                                                    <!--To display step content between shipping step and payment step  1 < "sortOrder" < 2 -->
                                                    <!--To display step content after payment step "sortOrder" > 2 -->
                                                <item name="sortOrder" xsi:type="string">2</item>
                                                <item name="children" xsi:type="array">
                                                    <!--add here child component declaration for your step-->
                                                </item>
                                            </item>
                                        </item>
                                    </item>
                                </item>
                            </item>
                        </item>
                    </argument>
                </arguments>
        </referenceBlock>
    </body>
</page>
这是向结帐页面添加新步骤的步骤。
清理缓存并刷新浏览器,结果将如下所示