在 Magento 2 中,您可以在客户编辑页面中添加新的自定义选项卡。如果您想在客户编辑部分为您的自定义要求添加一个新选项卡,您可以在客户编辑部分轻松添加客户选项卡。
您需要创建一个简单的模块以在客户编辑部分添加额外的选项卡。
请参阅下面的代码片段以添加额外的选项卡,为简单起见,
我将 Rbj 作为Packagename并将 CustomerTab 作为模块名。
您需要创建第一个registration.php和module.xml文件来定义我们的模块。
路径:app/code/Rbj/CustomerTab/registration.php
<?php
\Magento\Framework\Component\ComponentRegistrar::register(
    \Magento\Framework\Component\ComponentRegistrar::MODULE,
    'Rbj_CustomerTab',
    __DIR__
);
创建 module.xml文件,路径:app/code/Rbj/CustomerTab/etc/module.xml
<?xml version="1.0"?>
<config xmlns:xsi="http://www.w3.org/2001/XMLSchema-instance" xsi:noNamespaceSchemaLocation="urn:magento:framework:Module/etc/module. xsd">
    <module name="Rbj_CustomerTab" setup_version="2.0.0">
        <sequence>
            <module name="Magento_Customer"/>
        </sequence>
    </module>
</config>
我们为 Magento 客户模块添加了一个依赖项,用于在客户编辑页面中添加一个新选项卡。因此,我们在上述 XML 文件的序列标签中定义了 Magento_Customer模块。
现在来到模块的主要入口点,
对于添加新选项卡,我们必须覆盖customer_index_edit.xml文件以添加添加自定义选项卡的逻辑。
referenceBlock customer_form包含客户编辑部分页面的选项卡列表。
我们已将Rbj\CustomerTab\Block\Adminhtml\CustomerEdit\Tab\View.php文件声明为块文件。
所以我们需要在我们的模块中创建一个customer_index_edit.xml
文件,路径如下:app/code/Rbj/CustomerTab/view/adminhtml/layout/customer_index_edit.xml
<?xml version="1.0"?>

<page xmlns:xsi="http://www.w3.org/2001/XMLSchema-instance"
      xsi:noNamespaceSchemaLocation="urn:magento:framework:View/Layout/etc/ page_configuration.xsd">
    <body>
        <referenceBlock name="customer_form">
            <block class="Rbj\CustomerTab\Block\Adminhtml\CustomerEdit\Tab\View" name="customertab_panel">
                <arguments>
                    <argument name="tab_label " xsi:type="string" translate="true">My Customer Tabe</argument>
                    <argument name="sort_order" xsi:type="number">100</argument>
                </arguments>
            </block>
        </referenceBlock>
    </body>
</page>
在上面的文件中,我们已经声明了 Block 文件来设置您想要在客户编辑页面的自定义选项卡中显示的自定义逻辑。
创建一个新的块 PHP 文件,
路径:app/code/Rbj/CustomerTab/Block/Adminhtml/CustomerEdit/Tab/View.php
<?php
namespace Rbj\CustomerTab\Block\Adminhtml\CustomerEdit\Tab;

class View extends \Magento\Backend\Block\Template implements \Magento\Ui\Component\Layout\Tabs\TabInterface
{
    /**
     * Template
     *
     * @var string
     */
    protected $_template = 'tab/customer_view.phtml';

    /**
     * View constructor.
     * @param \Magento\Backend\Block\Template\Context $context
     * @param \Magento\Framework\Registry $registry
     * @param array $data
     */
    public function __construct(
        \Magento\Backend\Block\Template\Context $context,
        \Magento\Framework\Registry $registry,
        array $data = []
    ) {
        $this->_coreRegistry = $registry;
        parent::__construct($context, $data);
    }

    /**
     * @return string|null
     */
    public function getCustomerId()
    {
        return $this->_coreRegistry->registry(\Magento\Customer\Controller\RegistryConstants::CURRENT_CUSTOMER_ID);
    }

    /**
     * @return \Magento\Framework\Phrase
     */
    public function getTabLabel()
    {
        return __('Custom Tab');
    }

    /**
     * @return \Magento\Framework\Phrase
     */
    public function getTabTitle()
    {
        return __('Custom Tab');
    }

    /**
     * @return bool
     */
    public function canShowTab()
    {
        if ($this->getCustomerId()) {
            return true;
        }
        return false;
    }

    /**
     * @return bool
     */
    public function isHidden()
    {
        if ($this->getCustomerId()) {
            return false;
        }
        return true;
    }

    /**
     * Tab class getter
     *
     * @return string
     */
    public function getTabClass()
    {
        return '';
    }

    /**
     * Return URL link to Tab content
     *
     * @return string
     */
    public function getTabUrl()
    {
        return '';
    }

    /**
     * Tab should be loaded trough Ajax call
     *
     * @return bool
     */
    public function isAjaxLoaded()
    {
        return false;
    }
}
上面的文件,我们可以使用$_template变量声明模板文件。
protected $_template = 'tab/customer_view.phtml'用于我们自定义标签的模板文件。
您可以通过 getTabLabel() 设置自定义标签标签,并使用 getTabTitle() 函数设置标题。您可以在上面的文件中为您的要求定义自定义函数。
如果要通过 ajax 显示自定义选项卡的内容,则需要为 isAjaxLoaded() 函数返回 true。
您可以通过调用 Magento\Framework\Registry 对象来获取当前客户数据。
现在我们需要创建模板文件,路径:app/code/Rbj/CustomerTab/view/adminhtml/templates/tab/customer_view.phtml
<?php
/**
 * @var $block \Rbj\CustomerTab\Block\Adminhtml\CustomerEdit\Tab\View
 */
?>

<div class="fieldset-wrapper customer-information">
    <div class="fieldset-wrapper-title">
        <span class="title"><?php /* @escapeNotVerified */
            echo __('Information for new Customer tab') ?></span>
    </div>
    <table class="admin__table-secondary">
        <tbody>
        <?php echo $block->getChildHtml(); ?>
        <tr>
            <th><?php /* @escapeNotVerified */
                echo __('Customer ID:') ?></th>
            <td><?php echo $block->getCustomerId(); ?></td>
        </tr>
        <tr>
            <th><?php /* @escapeNotVerified */
                echo __('Customer History:') ?></th>
            <td><?php echo __('History of Customer display') ?></td>
        </tr>
        </tbody>
    </table>
</div>
现在运行升级命令来安装我们的模块。
php bin/magento 设置:升级
php bin/magento 缓存:刷新
php bin/magento 索引器:重新索引 customer_grid
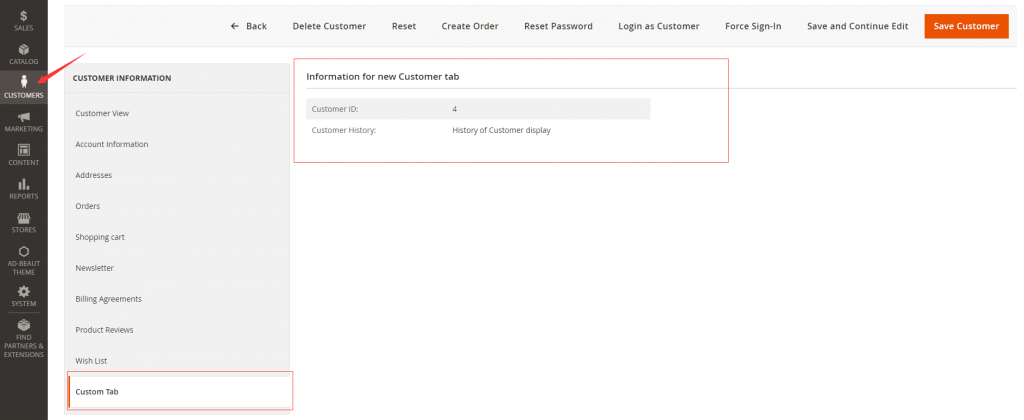
现在转到管理面板,
使用您的凭据登录,
单击左侧栏,客户 -> 所有客户链接,
单击任何客户,您可以在客户编辑页面中将标签显示为新的自定义标签。