在本文中,我们将了解如何在Magento 2后端中创建管理网格。如您所知,Magento 2 Grid是一种列出数据库表中项目的表,并为您提供以下功能:排序,过滤,删除,更新项目等.HelloWorld为此产品网格,网格为顾客。
Magento 2提供了两种创建管理网格的方法:使用布局和使用组件。我们将找到它们的详细信息。在我们继续之前,请按照这篇文章创建一个简单的模块,其中包含管理菜单,路由器,我们将用它来了解网格。在本文中,我将使用示例模块Mageplaza_HelloWorld和一些演示数据:
创建管理网格
- 第1步:创建数据库架构
- 第2步:创建路由管理员
- 第3步:创建管理菜单
- 第4步:创建控制器
- 第5步:使用Component创建管理网格
- 第6步:使用布局创建管理网格
第1步:创建数据库架构
数据库:我们将使用一个简单的数据库
app/code/Mageplaza/HelloWorld/Setup/InstallSchema.php安装模块时,此文件只执行一次。让我们为此文件添加此内容以创建上表:
<?php

namespace Mageplaza\HelloWorld\Setup;

class InstallSchema implements \Magento\Framework\Setup\InstallSchemaInterface
{

	public function install(\Magento\Framework\Setup\SchemaSetupInterface $setup, \Magento\Framework\Setup\ModuleContextInterface $context)
	{
		$installer = $setup;
		$installer->startSetup();
		if (!$installer->tableExists('mageplaza_helloworld_post')) {
			$table = $installer->getConnection()->newTable(
				$installer->getTable('mageplaza_helloworld_post')
			)
				->addColumn(
					'post_id',
					\Magento\Framework\DB\Ddl\Table::TYPE_INTEGER,
					null,
					[
						'identity' => true,
						'nullable' => false,
						'primary'  => true,
						'unsigned' => true,
					],
					'Post ID'
				)
				->addColumn(
					'name',
					\Magento\Framework\DB\Ddl\Table::TYPE_TEXT,
					255,
					['nullable => false'],
					'Post Name'
				)
				->addColumn(
					'url_key',
					\Magento\Framework\DB\Ddl\Table::TYPE_TEXT,
					255,
					[],
					'Post URL Key'
				)
				->addColumn(
					'post_content',
					\Magento\Framework\DB\Ddl\Table::TYPE_TEXT,
					'64k',
					[],
					'Post Post Content'
				)
				->addColumn(
					'tags',
					\Magento\Framework\DB\Ddl\Table::TYPE_TEXT,
					255,
					[],
					'Post Tags'
				)
				->addColumn(
					'status',
					\Magento\Framework\DB\Ddl\Table::TYPE_INTEGER,
					1,
					[],
					'Post Status'
				)
				->addColumn(
					'featured_image',
					\Magento\Framework\DB\Ddl\Table::TYPE_TEXT,
					255,
					[],
					'Post Featured Image'
				)
				->addColumn(
					'created_at',
					\Magento\Framework\DB\Ddl\Table::TYPE_TIMESTAMP,
					null,
					['nullable' => false, 'default' => \Magento\Framework\DB\Ddl\Table::TIMESTAMP_INIT],
					'Created At'
				)->addColumn(
					'updated_at',
					\Magento\Framework\DB\Ddl\Table::TYPE_TIMESTAMP,
					null,
					['nullable' => false, 'default' => \Magento\Framework\DB\Ddl\Table::TIMESTAMP_INIT_UPDATE],
					'Updated At')
				->setComment('Post Table');
			$installer->getConnection()->createTable($table);

			$installer->getConnection()->addIndex(
				$installer->getTable('mageplaza_helloworld_post'),
				$setup->getIdxName(
					$installer->getTable('mageplaza_helloworld_post'),
					['name', 'url_key', 'post_content', 'tags', 'featured_image'],
					\Magento\Framework\DB\Adapter\AdapterInterface::INDEX_TYPE_FULLTEXT
				),
				['name', 'url_key', 'post_content', 'tags', 'featured_image'],
				\Magento\Framework\DB\Adapter\AdapterInterface::INDEX_TYPE_FULLTEXT
			);
		}
		$installer->endSetup();
	}
}
我们在CRUD模型中创建了这个- 创建资源模型和模型集合
第2步:创建路由管理员
文件: app/code/Mageplaza/HelloWorld/etc/adminhtml/routes.xml
<?xml version="1.0"?>
<config xmlns:xsi="http://www.w3.org/2001/XMLSchema-instance" xsi:noNamespaceSchemaLocation="urn:magento:framework:App/etc/routes.xsd">
    <router id="admin">
        <route id="mageplaza_helloworld" frontName="mageplaza_helloworld">
            <module name="Mageplaza_HelloWorld"/>
        </route>
    </router>
</config>
第3步:创建管理菜单
管理菜单/路线:我们将使用mageplaza_helloworld管理页面的路线和菜单链接:
mageplaza_helloworld/post/index阅读如何创建管理菜单
第4步:创建控制器
创建控制器文件:请阅读Create Controller文章了解详细信息。
创建名为index.php的控制器文件
app/code/Mageplaza/HelloWorld/Controller/Adminhtml/Post/Index.php具有以下内容:
<?php

namespace Mageplaza\HelloWorld\Controller\Adminhtml\Post;

class Index extends \Magento\Backend\App\Action
{
	protected $resultPageFactory = false;

	public function __construct(
		\Magento\Backend\App\Action\Context $context,
		\Magento\Framework\View\Result\PageFactory $resultPageFactory
	)
	{
		parent::__construct($context);
		$this->resultPageFactory = $resultPageFactory;
	}

	public function execute()
	{
		$resultPage = $this->resultPageFactory->create();
		$resultPage->getConfig()->getTitle()->prepend((__('Posts')));

		return $resultPage;
	}


}
有两种创建管理网格的方法,在这篇文章的范围内,我们将讨论它们。
步骤5:方法#1 - 使用组件创建管理网格
步骤5.1:声明资源
在依赖注入文件中声明资源现在我们将创建di.xml将连接到Model的文件以获取网格的数据。
文件: app/code/Mageplaza/HelloWorld/etc/di.xml
具有以下内容:
<config xmlns:xsi="http://www.w3.org/2001/XMLSchema-instance" xsi:noNamespaceSchemaLocation="../../../../../lib/internal/Magento/Framework/ObjectManager/etc/config.xsd">
    <type name="Magento\Framework\View\Element\UiComponent\DataProvider\CollectionFactory">
        <arguments>
            <argument name="collections" xsi:type="array">
                <item name="mageplaza_helloworld_post_listing_data_source" xsi:type="string">Mageplaza\HelloWorld\Model\ResourceModel\Post\Grid\Collection</item>
            </argument>
        </arguments>
    </type>
    <virtualType name="Mageplaza\HelloWorld\Model\ResourceModel\Post\Grid\Collection" type="Magento\Framework\View\Element\UiComponent\DataProvider\SearchResult">
        <arguments>
            <argument name="mainTable" xsi:type="string">mageplaza_helloworld_post</argument>
            <argument name="resourceModel" xsi:type="string">Mageplaza\HelloWorld\Model\ResourceModel\Post</argument>
        </arguments>
    </virtualType>
</config>
该文件将声明表的post集合类,表和resourceModel。将在布局文件中调用此源以获取网格数据。
步骤5.2:创建布局文件
对于操作mageplaza_helloworld/post/index,我们将创建一个布局文件名mageplaza_helloworld_post_index.xml
文件: app/code/Mageplaza/HelloWorld/view/adminhtml/layout/mageplaza_helloworld_post_index.xml
具有以下内容:
<page xmlns:xsi="http://www.w3.org/2001/XMLSchema-instance" xsi:noNamespaceSchemaLocation="../../../../../../../lib/internal/Magento/Framework/View/Layout/etc/page_configuration.xsd">
    <update handle="styles"/>
    <body>
        <referenceContainer name="content">
            <uiComponent name="mageplaza_helloworld_post_listing"/>
        </referenceContainer>
    </body>
</page>在此布局文件中,我们为此页面的内容声明了一个uiComponent。
步骤5.3:创建组件布局文件
作为布局文件中的声明,我们将创建一个组件文件 mageplaza_helloworld_post_listing.xml
文件:app / code / Mageplaza / HelloWorld / view / adminhtml / ui_component / mageplaza_helloworld_post_listing.xml
具有以下内容:
<listing xmlns:xsi="http://www.w3.org/2001/XMLSchema-instance" xsi:noNamespaceSchemaLocation="urn:magento:module:Magento_Ui:etc/ui_configuration.xsd">
<argument name="data" xsi:type="array">
<item name="js_config" xsi:type="array">
<item name="provider" xsi:type="string">mageplaza_helloworld_post_listing.mageplaza_helloworld_post_listing_data_source</item>
<item name="deps" xsi:type="string">mageplaza_helloworld_post_listing.mageplaza_helloworld_post_listing_data_source</item>
</item>
<item name="spinner" xsi:type="string">spinner_columns</item>
<item name="buttons" xsi:type="array">
<item name="add" xsi:type="array">
<item name="name" xsi:type="string">add</item>
<item name="label" xsi:type="string" translate="true">Add New Post</item>
<item name="class" xsi:type="string">primary</item>
<item name="url" xsi:type="string">*/*/new</item>
</item>
</item>
</argument>
<dataSource name="nameOfDataSource">
<argument name="dataProvider" xsi:type="configurableObject">
<argument name="class" xsi:type="string">Magento\Framework\View\Element\UiComponent\DataProvider\DataProvider</argument>
<argument name="name" xsi:type="string">mageplaza_helloworld_post_listing_data_source</argument>
<argument name="primaryFieldName" xsi:type="string">post_id</argument>
<argument name="requestFieldName" xsi:type="string">id</argument>
<argument name="data" xsi:type="array">
<item name="config" xsi:type="array">
<item name="component" xsi:type="string">Magento_Ui/js/grid/provider</item>
<item name="update_url" xsi:type="url" path="mui/index/render"/>
<item name="storageConfig" xsi:type="array">
<item name="indexField" xsi:type="string">post_id</item>
</item>
</item>
</argument>
</argument>
</dataSource>
<columns name="spinner_columns">
<selectionsColumn name="ids">
<argument name="data" xsi:type="array">
<item name="config" xsi:type="array">
<item name="resizeEnabled" xsi:type="boolean">false</item>
<item name="resizeDefaultWidth" xsi:type="string">55</item>
<item name="indexField" xsi:type="string">post_id</item>
</item>
</argument>
</selectionsColumn>
<column name="post_id">
<argument name="data" xsi:type="array">
<item name="config" xsi:type="array">
<item name="filter" xsi:type="string">textRange</item>
<item name="sorting" xsi:type="string">asc</item>
<item name="label" xsi:type="string" translate="true">ID</item>
</item>
</argument>
</column>
<column name="name">
<argument name="data" xsi:type="array">
<item name="config" xsi:type="array">
<item name="filter" xsi:type="string">text</item>
<item name="editor" xsi:type="array">
<item name="editorType" xsi:type="string">text</item>
<item name="validation" xsi:type="array">
<item name="required-entry" xsi:type="boolean">true</item>
</item>
</item>
<item name="label" xsi:type="string" translate="true">Name</item>
</item>
</argument>
</column>
<column name="created_at" class="Magento\Ui\Component\Listing\Columns\Date">
<argument name="data" xsi:type="array">
<item name="config" xsi:type="array">
<item name="filter" xsi:type="string">dateRange</item>
<item name="component" xsi:type="string">Magento_Ui/js/grid/columns/date</item>
<item name="dataType" xsi:type="string">date</item>
<item name="label" xsi:type="string" translate="true">Created</item>
</item>
</argument>
</column>
<column name="updated_at" class="Magento\Ui\Component\Listing\Columns\Date">
<argument name="data" xsi:type="array">
<item name="config" xsi:type="array">
<item name="filter" xsi:type="string">dateRange</item>
<item name="component" xsi:type="string">Magento_Ui/js/grid/columns/date</item>
<item name="dataType" xsi:type="string">date</item>
<item name="label" xsi:type="string" translate="true">Modified</item>
</item>
</argument>
</column>
</columns>
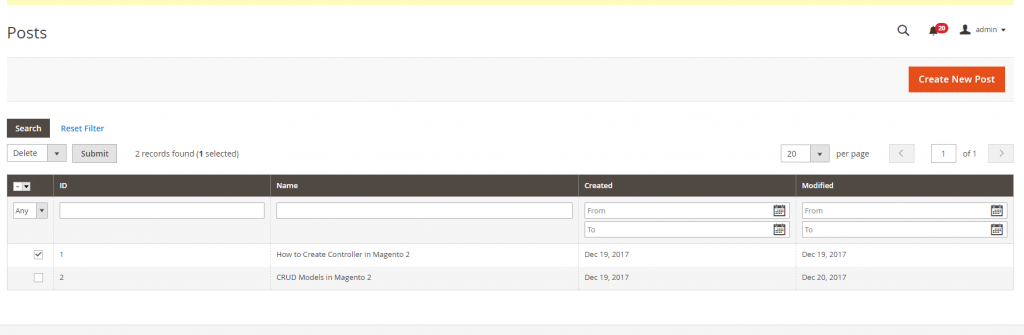
</listing>使用此代码,您将了解如何声明Grid布局(按钮,列),调用数据源。请刷新缓存,并访问此网格页面,管理网格将显示如下:

步骤5.4:创建列表工具栏
正如我在本页顶部所说,Magento 2 Grid将支持一些与网格交互的操作,如:排序,过滤,操作删除/更新等。排序功能是网格的默认操作。您可以单击列标题来对项目进行排序。我们将了解如何为网格构建其他功能。
为此做好准备,我们将在组件布局文件的父列表下创建一个列表工具栏元素:
文件:app / code / Mageplaza / HelloWorld / view / adminhtml / ui_component / mageplaza_helloworld_post_listing.xml
<?xml version="1.0" encoding="UTF-8"?>
<listing xmlns:xsi="http://www.w3.org/2001/XMLSchema-instance" xsi:noNamespaceSchemaLocation="urn:magento:module:Magento_Ui:etc/ui_configuration.xsd">
    <!-- ... other block of code -->
    <listingToolbar name="listing_top">
        <argument name="data" xsi:type="array">
            <item name="config" xsi:type="array">
                <item name="sticky" xsi:type="boolean">true</item>
            </item>
        </argument>
    </listingToolbar>
    <!-- ... other block of code -->
</listing>
步骤5.5:创建书签
此参数用于定义Magento/Ui/view/base/web/templates/grid/toolbar.html将加载的模板,以定义用于处理此网格中的所有ajax更新操作的knockout js。我们将在此容器内定义上述功能。您可以将此容器元素放在columns元素之前或之后,以定义工具栏的位置(列的上方或下方)。让我们看看每个动作的细节:Bookmark
文件:app / code / Mageplaza / HelloWorld / view / adminhtml / ui_component / mageplaza_helloworld_post_listing.xml
<?xml version="1.0" encoding="UTF-8"?>
<listing xmlns:xsi="http://www.w3.org/2001/XMLSchema-instance" xsi:noNamespaceSchemaLocation="urn:magento:module:Magento_Ui:etc/ui_configuration.xsd">
    <!-- ... other block of code -->
    <listingToolbar name="listing_top">
	<!-- ... other block of code -->
	<bookmark name="bookmarks"/>
    </listingToolbar>
    <!-- ... other block of code -->
</listing> 这将添加书签功能,允许管理员设置state网格的差异。每个state可能有一个不同的列列表。因此,对于每个管理员用户,他们可以选择显示与他相关的信息。
步骤5.6:列控件
此节点将添加列列表框,允许管理员用户可以选择哪些列可以显示在网格上。更改此列表后,管理员可以将该状态保存为允许快速访问此状态的书签。
文件:app / code / Mageplaza / HelloWorld / view / adminhtml / ui_component / mageplaza_helloworld_post_listing.xml
<?xml version="1.0" encoding="UTF-8"?>
<listing xmlns:xsi="http://www.w3.org/2001/XMLSchema-instance" xsi:noNamespaceSchemaLocation="urn:magento:module:Magento_Ui:etc/ui_configuration.xsd">
    <!-- ... other block of code -->
    <listingToolbar name="listing_top">
	<!-- ... other block of code -->
	<columnsControls name="columns_controls"/>
    </listingToolbar>
    <!-- ... other block of code -->
</listing>
步骤5.7:全文搜索
此节点将在Grid顶部添加一个搜索框。您可以使用它来搜索表中的所有数据。
文件:app / code / Mageplaza / HelloWorld / view / adminhtml / ui_component / mageplaza_helloworld_post_listing.xml
<?xml version="1.0" encoding="UTF-8"?>
<listing xmlns:xsi="http://www.w3.org/2001/XMLSchema-instance" xsi:noNamespaceSchemaLocation="urn:magento:module:Magento_Ui:etc/ui_configuration.xsd">
    <!-- ... other block of code -->
    <listingToolbar name="listing_top">
	<!-- ... other block of code -->
	<filterSearch name="fulltext"/>
    </listingToolbar>
    <!-- ... other block of code -->
</listing>
步骤5.8:过滤
此节点为每列定义过滤器框。您可以通过单击网格顶部的“过滤器”按钮来查看此信息。
文件:app / code / Mageplaza / HelloWorld / view / adminhtml / ui_component / mageplaza_helloworld_post_listing.xml
<?xml version="1.0" encoding="UTF-8"?>
<listing xmlns:xsi="http://www.w3.org/2001/XMLSchema-instance" xsi:noNamespaceSchemaLocation="urn:magento:module:Magento_Ui:etc/ui_configuration.xsd">
    <!-- ... other block of code -->
    <listingToolbar name="listing_top">
	<!-- ... other block of code -->
	<filters name="listing_filters" />
    </listingToolbar>
    <!-- ... other block of code -->
</listing>
步骤5.9:群众行动
此节点将批量操作选择添加到网格。管理员可以使用此操作快速对多个项目执行某些操作。
文件:app / code / Mageplaza / HelloWorld / view / adminhtml / ui_component / mageplaza_helloworld_post_listing.xml
<?xml version="1.0" encoding="UTF-8"?>
<listing xmlns:xsi="http://www.w3.org/2001/XMLSchema-instance" xsi:noNamespaceSchemaLocation="urn:magento:module:Magento_Ui:etc/ui_configuration.xsd">
    <!-- ... other block of code -->
    <listingToolbar name="listing_top">
	<!-- ... other block of code -->
        <massaction name="listing_massaction">
            <argument name="data" xsi:type="array">
                <item name="config" xsi:type="array">
                    <item name="component" xsi:type="string">Magento_Ui/js/grid/tree-massactions</item>
                </item>
            </argument>
            <action name="delete">
                <argument name="data" xsi:type="array">
                    <item name="config" xsi:type="array">
                        <item name="type" xsi:type="string">delete</item>
                        <item name="label" xsi:type="string" translate="true">Delete</item>
                        <item name="url" xsi:type="url" path="mageplaza_helloworld/post/massDelete"/>
                        <item name="confirm" xsi:type="array">
                            <item name="title" xsi:type="string" translate="true">Delete Post</item>
                            <item name="message" xsi:type="string" translate="true">Are you sure you wan't to delete selected items?</item>
                        </item>
                    </item>
                </argument>
            </action>
        </massaction>
    </listingToolbar>
    <!-- ... other block of code -->
</listing>
步骤5.10:寻呼
此节点将添加网格的分页。如果表中包含大量数据,这将非常有用。
文件:app / code / Mageplaza / HelloWorld / view / adminhtml / ui_component / mageplaza_helloworld_post_listing.xml
<?xml version="1.0" encoding="UTF-8"?>
<listing xmlns:xsi="http://www.w3.org/2001/XMLSchema-instance" xsi:noNamespaceSchemaLocation="urn:magento:module:Magento_Ui:etc/ui_configuration.xsd">
    <!-- ... other block of code -->
    <listingToolbar name="listing_top">
	<!-- ... other block of code -->
	<paging name="listing_paging"/>
    </listingToolbar>
    <!-- ... other block of code -->
</listing>
步骤5.11:导出按钮
此节点将添加导出按钮,您可以导出网格数据。
<?xml version="1.0" encoding="UTF-8"?>
<listing xmlns:xsi="http://www.w3.org/2001/XMLSchema-instance" xsi:noNamespaceSchemaLocation="urn:magento:module:Magento_Ui:etc/ui_configuration.xsd">
    <!-- ... other block of code -->
    <listingToolbar name="listing_top">
	<!-- ... other block of code -->
	<exportButton name="export_button"/>
    </listingToolbar>
    <!-- ... other block of code -->
</listing>
尝试清除缓存并转到网格页面,您将看到如下网格:

第6步:方法#2 - 使用布局创建管理网格
重要!跳过这一步,如果你已经准备好做第5步
您刚刚找到了如何使用Component 添加Magento 2 Grid。现在我们将看到如何使用普通layout/block文件来完成它。
步骤6.1:为此网格创建块
文件:app / code / Mageplaza / Mageplaza / Block / Adminhtml / Post.php
<?php
namespace Mageplaza\HelloWorld\Block\Adminhtml;

class Post extends \Magento\Backend\Block\Widget\Grid\Container
{

	protected function _construct()
	{
		$this->_controller = 'adminhtml_post';
		$this->_blockGroup = 'Mageplaza_HelloWorld';
		$this->_headerText = __('Posts');
		$this->_addButtonLabel = __('Create New Post');
		parent::_construct();
	}
} Grid块将扩展\Magento\Backend\Block\Widget\Grid\Container并定义_construct()方法中的一些变量。
_blockGroup是我们的格式模块的名称VendorName_ModuleName_controller是Block文件夹中Grid块的路径。在这个helloWorld中,我将Grid.php文件放在Adminhtml/Post文件夹中_headerText是网格页面标题_addButtonLabel是添加新按钮的标签。
步骤6.2:创建布局文件
现在我们需要一个布局文件来连接Grid Block并渲染网格。我们来创建这个文件:
文件:
app/code/Mageplaza/HelloWorld/view/adminhtml/layout/mageplaza_helloworld_post_index.xml
<?xml version="1.0"?>
<page xmlns:xsi="http://www.w3.org/2001/XMLSchema-instance" xsi:noNamespaceSchemaLocation="urn:magento:framework:View/Layout/etc/page_configuration.xsd">
    <update handle="styles"/>
    <body>
        <referenceContainer name="content">
            <block class="Mageplaza\HelloWorld\Block\Adminhtml\Post" name="mageplaza_post_grid">
                <block class="Magento\Backend\Block\Widget\Grid" name="mageplaza_post_grid.grid" as="grid">
                    <arguments>
                        <argument name="id" xsi:type="string">post_id</argument>
                        <argument name="dataSource" xsi:type="object">Mageplaza\HelloWorld\Model\ResourceModel\Post\Collection</argument>
                        <argument name="default_sort" xsi:type="string">id</argument>
                        <argument name="default_dir" xsi:type="string">ASC</argument>
                        <argument name="save_parameters_in_session" xsi:type="string">1</argument>
                    </arguments>
                    <block class="Magento\Backend\Block\Widget\Grid\ColumnSet" name="mageplaza_post_grid.grid.columnSet" as="grid.columnSet">
                        <arguments>
                            <argument name="rowUrl" xsi:type="array">
                                <item name="path" xsi:type="string">*/*/edit</item>
                            </argument>
                        </arguments>
                        <block class="Magento\Backend\Block\Widget\Grid\Column" as="post_id">
                            <arguments>
                                <argument name="header" xsi:type="string" translate="true">ID</argument>
                                <argument name="index" xsi:type="string">post_id</argument>
                                <argument name="type" xsi:type="string">text</argument>
                                <argument name="column_css_class" xsi:type="string">col-id</argument>
                                <argument name="header_css_class" xsi:type="string">col-id</argument>
                            </arguments>
                        </block>
                        <block class="Magento\Backend\Block\Widget\Grid\Column" as="name">
                            <arguments>
                                <argument name="header" xsi:type="string" translate="true">Name</argument>
                                <argument name="index" xsi:type="string">name</argument>
                                <argument name="type" xsi:type="string">text</argument>
                                <argument name="column_css_class" xsi:type="string">col-id</argument>
                                <argument name="header_css_class" xsi:type="string">col-id</argument>
                            </arguments>
                        </block>
                        <block class="Magento\Backend\Block\Widget\Grid\Column" as="created_at">
                            <arguments>
                                <argument name="header" xsi:type="string" translate="true">Created</argument>
                                <argument name="index" xsi:type="string">created_at</argument>
                                <argument name="type" xsi:type="string">date</argument>
                                <argument name="column_css_class" xsi:type="string">col-id</argument>
                                <argument name="header_css_class" xsi:type="string">col-id</argument>
                            </arguments>
                        </block>
                        <block class="Magento\Backend\Block\Widget\Grid\Column" as="updated_at">
                            <arguments>
                                <argument name="header" xsi:type="string" translate="true">Modified</argument>
                                <argument name="index" xsi:type="string">updated_at</argument>
                                <argument name="type" xsi:type="string">date</argument>
                                <argument name="column_css_class" xsi:type="string">col-id</argument>
                                <argument name="header_css_class" xsi:type="string">col-id</argument>
                            </arguments>
                        </block>
                    </block>
                </block>
            </block>
        </referenceContainer>
    </body>
</page>
在这个布局文件中,我们将为网格定义一些参数。主要参数是dataSource。此参数将链接到我们在上面的di.xml文件中声明的dataSource,以连接到数据库并获取此网格的数据。
步骤6.4:添加列
列集将定义将在网格中显示的列。如果要使用massAction,可以将此块添加到grid元素:
<block class="Magento\Backend\Block\Widget\Grid\Massaction" name="mageplaza.helloWorld.massaction" as="grid.massaction">
    <arguments>
        <argument name="massaction_id_field" xsi:type="string">post_id</argument>
        <argument name="form_field_name" xsi:type="string">ids</argument>
        <argument name="use_select_all" xsi:type="string">1</argument>
        <argument name="options" xsi:type="array">
            <item name="disable" xsi:type="array">
                <item name="label" xsi:type="string" translate="true">Delete</item>
                <item name="url" xsi:type="string">*/*/massDelete</item>
            </item>
        </argument>
    </arguments>
</block>
在此之后,请刷新缓存并转到网格页面以查看结果。它可能会显示如下: