如何自定义结帐步骤的样式
定制检出步骤的样式意味着在检出页面中删除,禁用或添加组件。
** =>探索Magento 2一站式结帐模块
由于主题涉及面很广,因此我们将从Magento Official Devdocs文档中的示例开始。然后,我们将添加自己的组件(新闻通讯注册组件)
自定义结帐步骤的样式。
您应该知道如何创建基本的Magento 2模块。所有自定义文件都将在此模块内。
让我们开始。
步骤1:了解Devdocs文档中的示例。
Devdocs通过Magento Shipping模块为我们提供了示例,该模块创建了一个策略组件。
这是将组件添加到布局的代码。
<item name="shipping_policy" xsi:type="array">
  <item name="component" xsi:type="string">Magento_Shipping/js/view/checkout/shipping/shipping-policy</item>
</item>
如您所见,该组件只是一个javascript文件(js)。让我们打开它vendor/magento/module-shipping/view/frontend/web/js/view/checkout/shipping/shipping-policy.js
/**
 * Copyright © 2013-2017 Magento, Inc. All rights reserved.
 * See COPYING.txt for license details.
 */
define([
    'uiComponent',
    'Magento_Shipping/js/model/config'

], function (Component, config) {
    'use strict';

    return Component.extend({
        defaults: {
            template: 'Magento_Shipping/checkout/shipping/shipping-policy'
        },
        config: config()
    });
});
这里不多,它只是定义了模板 vendor/magento/module-shipping/view/frontend/web/template/checkout/shipping/shipping-policy.html
总而言之,一个组件包含一个js,并以html文件作为其模板。
第2步:添加新的通讯注册组件。
步骤2.1:创建一个js文件。
newsletter.js在Mageplaza/HelloWorld/view/frontend/web/js/view目录下创建文件。
编码:
define(
    [
        'ko',
        'uiComponent'
    ],
    function (ko, Component) {
        "use strict";

        return Component.extend({
            defaults: {
                template: 'Mageplaza_HelloWorld/newsletter'
            },
            isRegisterNewsletter: true
        });
    }
);
步骤2.2:创建模板html文件。
newsletter.html在Mageplaza/HelloWorld/view/frontend/web/template目录下创建文件。
编码:
<div class="col-mp mp-12">
    <input type="checkbox" name="newsletter" data-bind="checked: isRegisterNewsletter, attr: {id: 'place-order-newsletter'}"/>
    <label data-bind="attr: {for: 'place-order-newsletter'}"><span data-bind="i18n: 'Register for newsletter'"></span></label>
</div>
步骤2.3:将我们的组件添加到结帐页面的布局中。
将以下代码添加到。Mageplaza/HelloWorld/view/frontend/layout/checkout_index_index.xml
我们在shippingMethod表单之前添加组件。
<page xmlns:xsi="http://www.w3.org/2001/XMLSchema-instance" layout="1column" xsi:noNamespaceSchemaLocation="urn:magento:framework:View/Layout/etc/page_configuration.xsd">
<body>
<referenceBlock name="checkout.root">
<arguments>
<argument name="jsLayout" xsi:type="array">
<item name="components" xsi:type="array">
<item name="checkout" xsi:type="array">
<item name="children" xsi:type="array">
<item name="steps" xsi:type="array">
<item name="children" xsi:type="array">
<!-- Modifying an existing step-->
<item name="shipping-step" xsi:type="array">
<item name="children" xsi:type="array">
<item name="shippingAddress" xsi:type="array">
<item name="children" xsi:type="array">
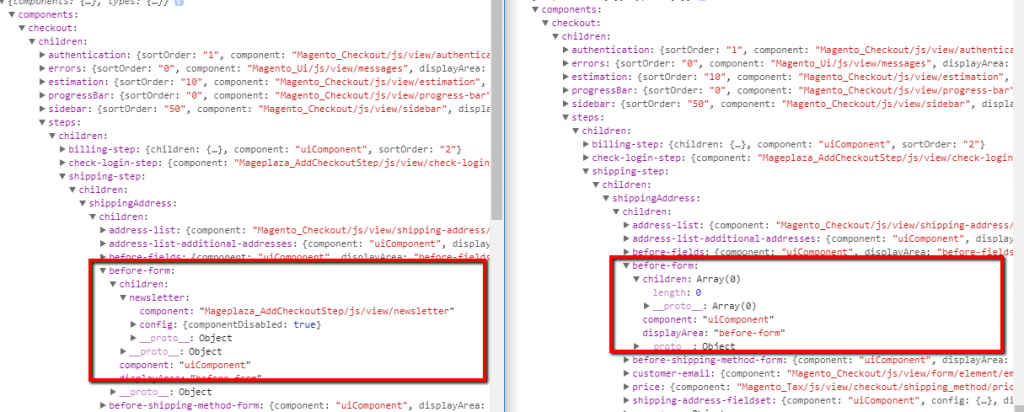
<item name="before-form" xsi:type="array">
<item name="children" xsi:type="array">
<item name="newsletter" xsi:type="array">
<item name="component" xsi:type="string">Mageplaza_HelloWorld/js/view/newsletter</item>
</item>
</item>
</item>
</item>
</item>
</item>
</item>
</item>
</item>
</item>
</item>
</item>
</argument>
</arguments>
</referenceBlock>
</body>
</page>
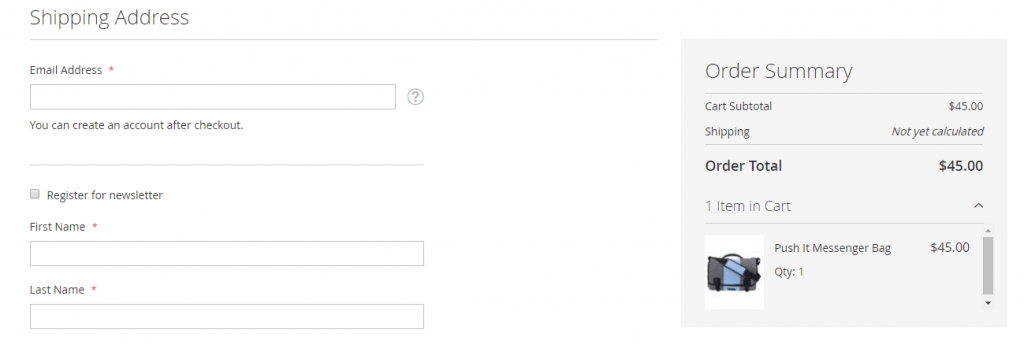
清理缓存,刷新浏览器,结果将如下所示
步骤2.4:禁用新闻通讯注册组件。
这是禁用组件的代码。
<item name="config" xsi:type="array">
       <item name="componentDisabled" xsi:type="boolean">true</item>
</item>
整个节点情况如何
<item name="newsletter" xsi:type="array">
       <item name="component" xsi:type="string">Mageplaza_HelloWorld/js/view/newsletter</item>
       <item name="config" xsi:type="array">
             <item name="componentDisabled" xsi:type="boolean">true</item>
       </item>
</item>
步骤2.5:移除组件。
要删除组件,您需要为\ Magento \ Checkout \ Block \ Checkout \ LayoutProcessor :: process方法创建一个插件。并实施around method。这就是Devdocs的建议。
如建议的那样,我们实现该aroundProcess方法并添加以下代码
public function aroundProcess($subject, $proceed, $jsLayout)
{
        unset($jsLayout['components']['checkout']['children']['steps']['children']['shipping-step']['children']['shippingAddress']['children']['before-form']['children']['newsletter']);
        $returnValue = $proceed($jsLayout);
        return $returnValue;
}
这是实时渲染时禁用和删除组件之间的区别